Advanced
- Package Architecture
- User Data, Settings, Units, and Epsilon
- Shapes and Convexity
- Bodies
- World
- The Pipeline & Events
Package Architecture
dyn4j is intended to be modular in the sense that collision detection and physical simulation are complimentatry and be used separately. Understanding this architecture can help you understand how to use the library and find the classes you are looking for.
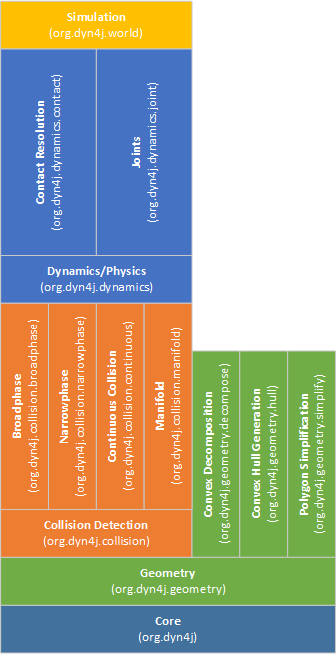
The core package contains a few things that are related to all the packages.
The geometry package defines Shapes, Mass, Vector, Matrix, affine Transform, AABB, Ray, etc. used in all the packages. This package also includes a few complementary packages for convex decomposition, convex hull generation, and polygon simplification that are not used internally. Instead, they are intended for use in your application to assist with convex shape generation.
Remember that dyn4j only supports convex shapes - to make non-convex shaped objects, you must combine convex shapes together in a
Body.
The collision detection package defines all the logic and algorithms to perform collision detection with convex shapes. The collision detection pipeline is broken up into 3 (or 4) steps:
- Broadphase - Find all the possible collisions between all bodies
- Narrowphase - Of all the possible collisions, determine which are truely colliding
- Manifold - For those collisions found in the narrowphase, generate a manifold, or contact area for the collision
The last step, though not really part of the pipeline above, is to capture collisions that would be missed due to the discrete collision detection being performed is continuous. This phase would detect those missing collisions and resolve them.
The dynamics/physics package contains all the logic for handling those collisions found in the collision package. It also contains the definition for Joints. Both contacts and joints fall into the category of Constrained Dynamics and the necessary machinery to solve these is contained in this package.
Finally, the world package is used to bring all the packages together into a single entry point called World. There are two main implementations in this package, the AbstractCollisionWorld and AbstractPhysicsWorld. Most users will use the World class though.
User Data, Settings, Units, & Epsilon
Each Shape, Fixture/BodyFixture, and Body (and some other classes, see the Javadocs for details) contain a member variable called userData which is of type Object. This member can be used to store anything that you want to be associated with the object.
Settings
The Settings object contains settings for the dynamics package like the physics pipeline. Each instance of the World class has it’s own instance of Settings. You can use this object to set physics settings at any time. The Settings object is defaulted to the settings that worked best for all the samples in the samples project and common object sizes and use-cases. Many of the settings contained in the Settings object are used to configure the performance to accuracy trade off.
Units
The default units are Meter, Kilogram, Seconds or MKS. It is possible to use another measurement system, however, all the default settings in the Settings object and other classes will need to be adjusted. If possible, always use MKS, when thats not an option you can use the UnitConversion class to convert any values to MKS or from MKS.
The recommendation is to use MKS, it’ll be much easier to understand and control behaviors.
Epsilon
An inherent side effect of finite precision, floating point arithmetic is numeric error. Another problem to deal with is the lack of exact representation of all values. These two problems force many algorithms and logic to use epsilon-based comparisons instead of comparisons against 0. The Epsilon class attempts to approximate the machine epsilon for a double precision floating point number. This epsilon, \(e\) is the smallest floating point number such that \(x + e = x\). This value is used in a number of algorithms within dyn4j and can be used in game code as well via the Epsilon.E property.
dyn4j actually uses larger values than epsilon in some cases to improve performance and stability.
Like the Java programming language, rotations are specified in Radians. The Math.toRadians(double) and Math.toDegrees(double) methods can be used to convert to and from the different units.
Shapes & Convexity
All shapes added to bodies must be Convex. A convex shape is a shape where given any line, will only cross two edges of the shape (ignoring lines passing through vertices).
Not all shapes are supported by all collision detection algorithms. Specifically,
EllipseandHalfEllipse, are not supported by theSatalgorithm. The default algorithm isGjkwhich supports all shapes implemented in the library.
All shapes also have a getRadius method. This method returns the maximum radius of the shape (the rotation disc radius).
While the library is restricted to convex shapes, you can compose a Body with many convex shapes to make complex, non-convex objects using the Body.addFixture(...) methods.
Both the Shape and Body classes implement the Transformable interface. While the Body class’s implementation modifies the body’s transform, the Shape class’s implementation directly modifies the internal state of the shape. This is used to locally transform the shape when part of a multi-shape body. For example:
1
2
3
4
5
6
7
8
9
10
11
12
13
14
15
16
17
18
Body body = ...;
Convex c1 = Geometry.createCircle(0.5);
Convex c2 = Geometry.createCircle(1.0);
// if we add these both as-is to the body,
// they will both be positioned at the center

// instead we'll translate one of them to be
// offset from the center
c2.translate(1.0, 0.0);
// this action directly modified c2, in this
// case, translating the center point of the
// shape

// If this were a Polygon, all the vertices of
// the polygon would have been translated

body.addFixture(c1);
body.addFixture(c2);
Shapes can be reused in multiple bodies, but remember that if you transform a shape it will be transformed for all the bodies you added it to. Its recommended to avoid reuse of shapes.
The convex shapes you construct should avoid small, relative to the rest of the shapes in the world, and thin configurations. These types of shapes can cause strange artifacts like sticking, jitter, tunnelling, etc.
TIP: You should consider whether curved shapes are really necessary for your simulation. They are more expensive to simulate and can vary performance wildly. Many AAA games only use polygon based collision shapes for this reason. The
Geometryclass provides a number of helper methods to create polygonal shapes from curves.
Convex Hulls
Another way to create convex shapes is to generate one from a point set. Shapes created this way are called Convex Hulls and use the Polygon class as storage.
You can find algorithms to generate convex hulls in the org.dyn4j.geometry.hull package. The algorithms generate a minimum convex hull given a point set. All the algorithms should produce the same result, however one may be faster than another depending on the input.
These are intended for both pre-processing and runtime use.
Convex Decomposition
Another way to create convex shapes is to decompose a larger concave shape into smaller convex pieces.
As stated above and in the Getting Started page, all shapes used in the library must be convex. To help with this process some convex decomposition algorithms are provided. These algorithms operate on simple polygons without holes and generate a set of convex shapes that can be used in dyn4j.
While these are intended for use at anytime, these algorithms can produce convex shapes that are not ideal for simulation (as mentioned above).
Convex decomposition algorithms are in the org.dyn4j.geometry.decompose package. The algorithms provided are not optimal (in the sense of the least number of convex shapes) but have acceptable time complexity.
These are intended for both pre-processing and runtime use.
Segment vs. Segment Collision
Segment vs. Segment (and sub classes) collision detection works great, but you may find that Segment vs. Segment collision resolution does not.
The Segment class lives in the geometry package and extends the Convex interface. Because of this it can be used in collision detection and in the physics pipeline. This class represents a infinitely thin segment, so while collision detection works, collision resolution does not.
Custom Convex Shapes
If you choose to create your own Shape class you must implement the Convex interface for the new shape to be usable by the collision detection and physics pipelines.
Convex.getAxes(Vector2[],Transform)supportsSat. This should return all the axes that should be tested or null.Convex.getFoci(Vector2[])supportsSat. This should all focal points in the case of a circular shape.Convex.getFarthestPoint(Vector2,Transform)supportsGjk. This should return the farthest point along the given direction on the shape.Convex.getFarthestFeature(Vector2,Transform)supportsClippingManifoldSolver. This should return the feature farthest along the given direction on the shape.
The
Satalgorithm is specific to polygons and has been extended to supportCircle,Slice, andCapsule. It’s unlikely that you’d need to define a shape that works with SAT outside of what’s already supported. If you are creating your own shape, implement the methods to support GJK instead and throwUnsupportedOperationExceptionfor the SAT methods.
TIP: Generally speaking you shouldn’t need to define any new shapes.
Bodies
The Body class represents an object in the simulation. As mentioned before, it can contain many Fixtures each with one Shape. Most of the methods are pretty straight forward to understand from the javadocs. The following methods should not be used by consumers of the library:
Body.get/setFixtureModificationHandlerInternal only method. DO NOT use.Body.integrate{Position|Velocity}You shouldn’t ever need to use this.Body.updateAtRestTimeYou shouldn’t ever need to use this.
Technically speaking the AbstractCollisionBody and AbstractPhysicsBody classes implement all of the functionality in the Body class and could be extended directly, but the Body class provides a bit more convience for those not looking to exend these abstract classes.
The AbstractCollisionBody can be used in the AbstractCollisionWorld to simulate a world with collision detection only. There are only a few methods that need to be implemented to achieve this.
Creating a body follows this pattern:
1
2
3
4
5
6
7
8
9
10
// create an instance
Body body = new Body();
// add fixtures
body.addFixture(Geometry.createCircle(0.5));
// configure properties
body.setLinearVelocity(1.0, 0.0);
// set the mass
body.setMass(MassType.NORMAL);
// add it to a world
world.addBody(body);
A Body can only be added to a single World.
The body’s center of mass will be located at the center of all the attached fixtures. The best way to reposition it is use the Body.translateToOrigin() method first, then call the Body.translate(double, double) method. The default rotation will always be zero regardless of the attached fixtures.
Each Fixture, or BodyFixture in this case, can have it’s own density, coefficients of friction and restitution, sensor flag and Filter. The sensor flag indicates that a fixture is participating in collision detection, but not resolution. This can be used to report when objects are overlapping without the physics system applying correction impulses. The filter can be used to create groups of fixtures that can interact and those that can’t. More on filters later.
To translate/rotate the fixtures of a Body, call the translate/rotate methods on the fixture’s shape.
The mass of the body is calculated when the Body.setMass method is called. The default implementation will take the shapes and compute masses and combine them into the total mass for the body. You can override the mass by creating a new Mass object as well. You can also toggle special mass types like INFINITE, FIXED_ANGULAR_VELOCITY, and FIXED_LINEAR_VELOCITY.
You can change a body’s fixtures over time by adding/removing them. If you do, call the
Body.updateMass()method to ensure the mass, rotation disc radius, and center of mass are all updated. More on this later.
Apart from your standard body properties like velocity, force, etc. there are a few other properties that stand out:
- Use the
Body.setGravityScale(double)method to apply less or more gravity to individual bodies (the default is 1.0). - Use the
Body.set{Linear|Angular}Dampingmethods to reduce the energy of the system over time. - Use the
Body.setAtRestDetectionEnabledmethod to toggle at-rest detection which will put bodies to sleep when they stop. The default is true.
Integration with Game Objects
One common question is “How do I relate my game objects with Bodies in the World?” There are a few ways to choose from:
- The Body class can be extended, be careful when overriding methods - make sure you call the super method.
- The Body class can be contained in another class.
- The Body class can be completely separate by using the userData member variable for association.
All three methods are acceptable and intended for use. The samples uses extension.
Body State
The life time of a body is usually very long. Over that span the body’s state may change.
A body transitions to the at-rest state when the physics engine has determined that it is not moving significantly enough. The body is still tested for collisions but is excluded from the physics pipeline to save time. This happens when the body’s linear and angular velocity are below the thresholds defined by the Settings.getMaximumAtRest{Linear|Angular}Velocity() methods and when body has been below these thresholds for a certain period of time defined by the Settings.getMinimumAtRestTime() method. Automatic at-rest detection can be controlled on a body by body basis or globally using the Settings class via the setAtRestDetectionEnabled method.
A body is by default enabled, but transitions to the “inactive” state when the collision detection system detects that the entire body is outside the bounds of the world. The body no longer participates in collision detection or physics. This state will never be set automatically if the world has no bounds.
Using the setEnabled and setAtRest methods you can manually change these states.
Applying Forces, Torques, & Impulses
When applying forces and torques to a body, they are queued in an accumulator and not immediately applied. When a simulation step is performed, the stored forces and torques are applied to the body and placed in the force and torque member variables. This is done so that the previous simulation step’s force and torque values can be queried via the Body.getForce() and Body.getTorque() methods.
By default, when the force and torque is applied to the body, they are removed from the accumulators. The force and torque classes also feature an isComplete method that can be overridden by sub classes. This allows a force to be created that may or may not be removed at the end of a world step given the return of the isComplete method. Impulses, on the other hand, are applied to bodies immediately (not stored in an accumulator).
TIP: Applying forces, torques, or impulses to a body will immediately set the body’s at-rest state to false.
Collision Filtering
Collision filtering is used to only allow a category of bodies to collide with another category. Collision filtering is achieved by the Filter interface and the member on the Fixture/BodyFixture class. There are three Filter implementations provided, the Filter.DEFAULT_FILTER, the CategoryFilter (just like Box2D’s collision filter, int category + mask), and the TypeFilter.
You can also create your own filter classes to perform more advanced collision filtering by implementing the Filter interface.
There are some gotcha’s on this topic though:
- Collision filtering can be tricky; the collision filters can be called in either order
filter1.isAllowed(filter2)orfilter2.isAllowed(filter1). This can cause some confusion. Another problem is if the filters compared are not the same filter class type. TheCategoryFilteris conservative and will return true if the class types are not the same for example. Because of this, if you choose to make your own filter implementation class, make sure all Fixture/BodyFixture objects are given an instance of that same class. - The
Filter.DEFAULT_FILTERclass always returns true and is set by default on every Fixture/BodyFixture created. - The Filter on a Fixture/BodyFixture cannot be null. Use the
Filter.DEFAULT_FILTERinstead. - The
TypeFilterclass should not be used directly. Instead, it should be extended by your own classes. These extending classes are purely marker classes with no implementation. TheTypeFilterclass uses the inheritance hierarchy to perform filtering. Review the class documentation for an example.
Shape Editing
As mentioned earlier, throughout the life of a body, it’s shape(s) may need to change. For instance, two bodies collide and one body who has two shapes should break into two bodies, each with one shape. Situations where the shapes of a body need to change I call Shape Editing.
To edit the shapes of a body simply call the Body.addFixture(...) and Body.removeFixture(...) methods. After adding/removing fixtures, be sure to update the body’s mass via one of the Body.setMass(...) methods or the Body.updateMass() method to reflect the changes. For example:
1
2
3
4
5
6
Body body = ...
body.removeFixture(0);
body.addFixture(Geometry.createCircle(0.5));
body.addFixture(Geometry.createSquare(1.0));
// ...
body.updateMass();
TIP: Avoid modifying a shape’s internals after creation. While shapes like
Polygongive direct access to the vertices, and modification of those vertices is possible, it’s not supported. Instead, you should remove the shape from the body, create a new shape with the appropriate modifications, and add it to the body.
World
The World class is the orchestrator of the entire collision detection and physics pipeline. All bodies, joints, event listeners, etc. are added to the world object. To advance the simulation, i.e move bodies under gravity, prevent collisions, solve constraints, and so on, the world class must be updated. To advance the simulation you call either the World.step(...) or World.update(...) methods. For example:
1
2
3
4
5
6
7
// for a headless scenario
for (int i = 0; i < 1000; i++) {
  world.step(1);
}

// or if you were in some sort of render loop
world.update(elapsedTime);
One really important concept before we go further on the simulation pipeline is to understand that the World.step(...) and World.update(...) methods do not function the same. The World.step(...) method will always perform at least one simulation step - or one full execution of the simulation pipeline. The World.update(...) method accepts the given elapsed time and stores it in an accumulator and checks if the accumulator is greater than or equal to the Settings.getStepFrequency() and if so, will execute at least one simulation step. The key difference is that the World.update(...) method doesn’t always trigger a simulation step.
While the World class will likely be the only one you’ll need, the AbstractCollisionWorld and AbstractPhysicsWorld abstract classes implement nearly all of the functionality. This is an important callout for those who are looking to extend dyn4j further. A specific scenario is for a collision-only world. To achieve this, inherit from the AbstractCollisionWorld and you’re all set - all the storage, machinery, static queries, etc. are there.
A common quality of physical simulation is gravity. By default the World class has PhysicsWorld.EARTH_GRAVITY, which is 9.8 \(\frac{m}{s^2}\) in the negative y direction and zero in the x direction. Because gravity is a vector, this implies that the gravity of a would can be any magnitude or direction.
Collision Detection
The collision detection pipeline is broken down into 3 main phases: broadphase ← narrowphase ← manifold generation.
The broadphase represents a process of detecting possible collisions between all objects in the simulation. This process uses approximate bounding shapes of the real objects to reduce the cost of the accurate narrowphase. It’s acceptable for objects to be detected as colliding in this phase, but not in subsequent phases. The converse is not true, the broadphase should never miss a collision that the narrowphase would pick up. The default broadphase is DynamicAABBTree which, in addition to it’s primary purpose, also accelerates static raycast queries. Sap, which is another broadphase implementation, has similiar performance for collision detection, but has to use brute force for raycasting and therefore isn’t recommended.
The
BruteForceBroadphaseshouldn’t be used directly. It’s there as a reference implementation.
The narrowphase represents the process of taking the potentially colliding pairs, produced by the broadphase, and performing the accurate collision test. The result of this phase is either false, indicating the objects were NOT colliding, or a Penetration object. The narrowphase not only detects the collision, but will determine the MTV (minimum translation vector) and depth of the collision. The default narrowphase is Gjk which supports a large collection of shape types. It also has methods for raycasting and distance detection. Sat is an alternative implementation that is much simpler in design, but is generally limited to Polygons and Circular-curved shapes.
Manifold generation represents the process of taking the MTV and depth and building a contact patch - a set of vertices that represent where the collision is happening. In 2D this boils down to two different manifold types: Point or Edge. The default manifold generation process is ClippingManifoldSolver. There are no other implemenations of this iterface.
Lastly, the world classes come with a host of methods to do static collision queries. These queries can be used to track objects, implement behaviors, etc. Generally, there are two types of methods for these: an iterator or a list. For performance, you should use the iterator so that if you don’t exhaust the iterator, the process didn’t consume all the time need to get you the results as a list. For example:
1
2
3
4
5
6
7
8
9
10
11
Iterator<DetectResult<Body, BodyFixture>> resultIterator = world.detectIterator(
  Geometry.createCircle(0.5),
  new Transform(),
  new DetectFilter(true, true, null));

while (resultIterator.hasNext()) {
  DetectResult<Body, BodyFixture> result = resultIterator.next();
  Body body = result.getBody();
  BodyFixture fixture = result.getFixture();
  // ... do something with this information ...
}
Most, if not all,
iteratormethods reuse their return type - in the example above, theDetectResult. If you need to store the information you can either use the standard method that returns aListor use thecopymethod to create a copy of the result.
The last high-level process in collision detection is Continuous Collision Detection (or CCD). Because the process defined above is executed on a fixed iterval, every 1/60th of a second for example, it’s possible that collisions could be missed if a body is moving/rotating fast enough or if they are small enough. CCD is used to try to solve for these cases by finding when a missed collision will/did happen. In the context of dyn4j, the CCD implementation detects missed collisions rather than trying to prevent them from happening. dyn4j then uses what’s call the “time of impact” to replay the objects to that point in time. This can have the effect of jittery, slow movement in certain scenarios, but for the most part it’s not noticable.
As you might imagine, this process is very expensive. The first thing you should do is determine whether you need CCD at all and turn it off globally in that case. If you do need it, consider setting the mode to
BULLET_ONLYand mark bodies that should take part in CCD.
There’s only one implementation of CCD in dyn4j called ConservativeAdvancement.
TIP: While the goal is to prevent tunnelling, dyn4j’s CCD is not perfect. For the best results, avoid or limit large linear and (escpecially) angular velocities and keep your shapes as fat as possible.
Shifting
A rare but sometimes used feature of the library is the ability to shift the entire world. The primary use-case for this is to avoid numeric instability as your world extends outward. For example, imagine a side scroller game that continues for long time - you may start the simulation at coordinates (0, 0), but after 10 minutes of play, the player could be at (100000, 0) - eventually, you may run out of precision. You can use the World.shift(Vector2) method to move the entire world back to more reasonable coordinates. In our example here, we could shift the whole world back to the origin by:
1
world.shift(new Vector2(-100000, 0));
Coefficient Mixing
Each fixture on a body defines it’s friction and restitution, but when collisions occur, only one value can be used - the friction/restitution of the collision. To make sense of this, the world defines a CoefficientMixer which takes the colliding fixture’s coefficients and produces a single value.
Implicit Destruction Events
A world consists of bodies & joints and these objects generate other objects to describe things like collisions. When an object is removed from the world, those related objects must be removed as well. The notification of these events occur through the following methods:
DestructionListener.destroyed(Joint)Called when a body is removed from the world and it has attached joints. The joints related to the body must be removed as well. This event is called right before the joint is removed from the world.DestructionListener.destroyed(ContactConstraint)Called when a body is removed from the world and it’s in collision with other bodies. The ContactConstraints related to the body must be removed to make sure they no longer affect the simulation. This event is called right before the ContactConstraint is removed from the world.DestructionListener.destroyed(Body)Called when all bodies are removed from the world.
The object that triggered any of these events may already be removed from the world at the time these events are called.
These may also be called when removing all bodies/joints from the world using methods like
World.removeAllBodies(true). You can usefalseto ignore those events.
The Pipeline & Events
As described above, to advance a simulation, one of the World step/update methods must be called. Those methods invoke all the collision detection and physical simulation components of the library. Events are triggered throughout the process allowing you to take action. To help understand these events, it’s important to understand the order of operation of the simulation. What follows is a listing of the various events, ordered in the same sequence as they would be triggered.
TIP: You want to be very careful to NOT modify the World/Body/Fixture/etc. state during the events below. The recommended approach is to build a custom way to store relevant events so you can act on them later, either after the World.update/step method has returned or in the StepListener.end event.
StepListener.begin
A simulation step is triggered by the World.step(...) and World.update(...) methods. The first thing to occur is a call to all StepListeners from the StepListener.begin(TimeStep, PhysicsWorld) method. As mentioned earlier, the World.update(...) methods accumulate elapsed time and may not always execute a simulation step. You can use this event to know when a simulation step is executed.
You can also just use the boolean returned from the
World.update(...)to know if a step was executed, but only after the simulation step has completed and the update method has returned.
It’s safe to operate on any dyn4j objects in this event, but remember that if the Fixtures of bodies are changed, their collision detection information becomes invalid. dyn4j makes no attempt to detect this. In general, the most efficient place to make changes is in the
StepListener.postSolve(TimeStep, PhysicsWorld)event.
StepListener.updatePerformed
The next step in the process is to check the World.isUpdateRequired() flag. You can use this flag to force dyn4j to perform another collision detection pass before constraint solving. If this flag is true, after performing the collision detection process, the StepListener.updatePerformed(TimeStep, PhysicsWorld) method is called.
This should rarely be used. Most modifications to bodies/fixtures/joints etc. will be reflected on the next simulation step anyway.
ContactListener.preSolve
The next step in the process is to loop over all the ContactConstraints that will be solved and trigger ContactListener.preSolve(ContactCollisionData, Contact) events. You can use this time to update a few properties on the ContactConstraint before solving occurs.
Constraint Graph Solving
At this point, dyn4j has a ConstraintGraph which tracks the interaction between bodies and joints. This graph allows dyn4j to split the solving into Islands of independent bodies and joints and solve them separately. This improves the likely hood of solving the global constraint problem, improves performance, and improves stability.
Each Island is solved separately and performs the following steps:
- Apply forces and torques to get new velocities
- Initialize all constraints (bodies & joints) to prepare for solving
- Solve the velocity constraints
- Apply velocities to get new positions
- Solve position constraints
- Perform at-rest detection
No events are emitted during this process.
TIP: Solving of the ConstraintGraph is an expensive process but you can tweak the performance/accuracy tradeoff by adjusing the
Settings.getVelocityConstraintSolverIterations()andSettings.getPositionConstraintSolverIterations(). The lower the values, the more performant, the higher the values, the more accurate.
ContactListener.postSolve
Like the ContactListener.preSolve event, the ContactListener.postSolve(ContactCollisionData, SolvedContact) event is triggered for every contact that was solved in the previous step. You can use this event to inspect collision resolution results like applied impulses (though you can also get this information by iterating the collision data as well).
The SolvedContact.isSolved method will return false if an ill-conditioned two-point manifold existed (typically when the points are the same point or very close to each other). In this scenario, dyn4j will ignore one of the points and solve the other. Generally, this should have no effect on the simulation.
Continuous Collision Detection (CCD)
At this stage, dyn4j has solved the global constraint problem, including both joints and contacts. All the bodies have their previous positions stored in their Body.getPreviousTransform() and their new position in the Body.getTransform(). dyn4j uses these, along with the bodies velocities, to detect any collisions that will be missed by the discrete collision detection coming next.
This part of the process will detect potential Body-Body pairs first and report them as TimeOfImpactListener.collision(Body, Body) events. Afterwards, it iterates every pair of Fixtures from the two bodies, reporting an event for each through TimeOfImpactListener.collision(Body, BodyFixture, Body, BodyFixture). Usage of these events is intended to further filter out pairs of bodies/fixtures that should NOT be tested to improve performance. Collision detection is expensive, CCD is even more expensive.
From there, the pairs of fixtures are tested for missed collisions and if one is found it’s reported as a TimeOfImpactListener.collision(Body, BodyFixture, Body, BodyFixture, TimeOfImpact) event. What’s important for this event is that this may not be the earliest time of impact. Once the earliest time of impact has been found, dyn4j will linear interpolate them to the point of impact (with a bit of overlap) so that they will be found during the discrete collision detection step.
TIP: Only the first missed collision between bodies is resolved.
Collision Detection
Now that any missed collisions have found and resolved, the discrete collision detection stage kicks in. In this step we go through the process of collision detection outlined before. First we detect if any bodies have left the Bounds set on the world. If so, the BoundsListener.outside(Body) event is triggered.
A body is only considered outside the bounds when all of it’s fixtures are.
It’s call “discrete” because its only executed once per simulation step and each simulation step covers a period of time determined by
Settings.getStepFrequency().
Next, the broadphase collision detection process is executed. This will output a potentially colliding pair of Fixtures and report it using the CollisionListener.collision(BroadphaseCollisionData) method. You can return false from this event to prevent the process from continuing with that pair. If one CollisionListener returns false, all CollisionListeners registered on the World will still be notified of the event.
Before the
CollisionListener.collision(BroadphaseCollisionData)event is triggered, the configuredBroadphaseCollisionDataFilteris checked first. There shouldn’t be a need to override the default implementations, but it is possible. If you do, be sure to extend from the default classes based on your usage:CollisionBodyBroadphaseCollisionDataFilterfor collision detection only worlds andPhysicsBodyBroadphaseCollisionDataFilterfor physics worlds.
Next, the narrophase collision detection process is executed. This will output a colliding pair of fixtures and report it using the CollisionListener.collision(NarrowphaseCollisionData) method. Here you can examine the collision information like normal and depth. Just like the broadphase event, you can return false from this event to prevent the process from continuing with that pair. If one CollisionListener returns false, all CollisionListeners registered on the World will still be notified of the event.
Before the
CollisionListener.collision(NarrowphaseCollisionData)event is triggered, the configuredNarrowphasePostProcessorwill be executed. The purpose of this step is to take the results from the narrowphase and make any adjustments. In particular, dyn4j does this forLinkshape through theLinkPostProcessorclass to enable smooth sliding across a set of connected Links.
Next, the manifold generation process is executed. This will output a set of points which represent the collision location and report it using the CollisionListener.collision(ManifoldCollisionData) method. Here you can examine the collision information like collision points and their location on the constituent shapes. Just like the two events before, you can return false from this event to prevent the process from continuing with that pair. If one CollisionListener returns false, all CollisionListeners registered on the World will still be notified of the event.
Update of Contact Constraints
ContactConstraints represent the collisions between two Fixtures along with their physical attributes. The constraints are long lived and tracked when they begin, persist, and end. They also will hold the information output from the constraint solving process like normal and tangential impulse applied.
The first step in the process is to update the existing ContactConstraints with the new information found in the Manifold Solving step before. This includes new points, the normal, and depth. The collision coefficients are also recomputed at this time along with the sensor flag. As part of the update process the following events can be triggered:
ContactListener.begin(ContactCollisionData, Contact)is called when new contacts were foundContactListener.persist(ContactCollisionData, Contact, Contact)is called when existing contacts remainedContactListener.end(ContactCollisionData, Contact)is called when existing contacts no longer exist
There’s no guarantee that these will be triggered in any order. Because of this, you should avoid changing any data in the ContactConstraint from
ContactCollisionData.getContactConstraint()as it may not be fully updated when the event occurs. There’s another event triggered after all of these where you can make those changes.
Once the update process has completed, the ContactConstraint is added to the ConstraintGraph and the ContactListener.collision(ContactCollisionData) event is called. Here you can inspect all the data in the ContactConstraint and change certain properties. For example, you can disable the constraint by calling the ContactConstraint.setEnabled(false) or override the sensor flag by calling ContactConstraint.setSensor(true).
One interesting feature here is the
ContactConstraint.setTangentSpeed(double)which allows you to specify the speed at which bodies should move along the contact surface when in collision. A conveyor belt effect is the best way to describe it.
StepListener.end
Finally, the last step is to notify of the simulation step completion by the StepListener.end(TimeStep, PhysicsWorld) method. At this time the state of the world is solved collisions from the last step, bodies advanced forward in time, and newly detected collisions await being solved in the next simulation step.
Tags
Bible
Collision Detection
Constrained Dynamics
Contacts
EPA
Equality Constraints
GJK
Game Development
Java
One God
OpenGL
Physics
SAT
dyn4j
Categories
- 23 Blog
- 8 Collision Detection
- 19 Game Development
- 46 News
- 39 Release
- 10 Constrained Dynamics
- 11 Physics
- 1 Bible
Recent Posts
Posts by Year
2024
2022
2021
- Simple Polygon Simplification
- A Faster Broadphase in dyn4j 4.0.0
- WordPress to GitHub Pages
- dyn4j.org Moved to GitHub Pages
- Version 4.1.0
2020
2018
2017
2016
2015
2014
2013
2012
- Version 3.1.2
- Version 3.1.1
- Algorithmic and Architectural Gaming Design: Implementation and Development
- Version 3.1.0
- Version 3.0.3
2011
- dyn4j Project Setup Video
- Version 3.0.2
- Contact Points Using Clipping
- Version 3.0.1
- Version 3.0.0
- How A Differential Gear Works
- Prismatic Constraint
- The dyn4j TestBed Now Uses JOGL
- Version 2.2.3
- Version 2.2.2
2010
- Angle Constraint
- Line Constraint
- Pulley Constraint
- Weld Constraint
- Version 2.2.1
- Max Distance Constraint
- Version 2.2.0
- Version 2.1.0
- Distance Constraint
- A Few Services Ago
- Version 2.0.0
- Version 1.1.0
- Equality Constraints
- Documentation Update
- Point-to-Point Constraint
- dyn4j Is Released!
- Version 0.7.2
- EPA (Expanding Polytope Algorithm)
- GJK, Distance, Closest Points
- GJK (Gilbert–Johnson–Keerthi)
- SAT (Separating Axis Theorem)